WIND SPEED
Ensure the sensor is mounted vertically – an unobstructed rooftop is ideal.
• Your wind sensor should be the tallest object in the area to avoid educed wind speed values.
RAIN
Mount in an open area, preferably off the ground on a level platform.
• Clean out the bucket regularly to avoid debris; this can affect readings.
THERMO-HYGRO
Keep out of direct sunlight & ensure the sensor is well-ventilated.
• We recommend mounting it on a north-facing wall under an eave or deck for best results.
DISPLAY
Avoid placing the display directly next to electrical devices.
LTV-W1 or LTV-W2 Wind Speed Sensor
Installation:
1. Turn the battery cover of your wind sensor to the left.
2. Install fresh “C” batteries.
3. Carefully align and turn battery cover right to tighten.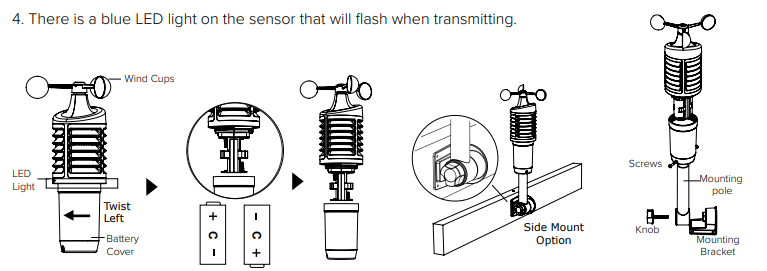
Mounting:
• Position in an open area that will have the least amount of interference with wind speed.
• Mount your sensor vertically with the wind cups on top.
• The maximum wireless transmission range to the station is up to 400 feet (121 meters) in open air, not
including walls or trees.
1. Use screws through the bottom of the mounting bracket to attach.
2. Insert bottom of pole into mounting bracket. Tighten knob to secure
3. Insert the included mounting pole into your sensor.
4. Tighten screws.
Alternatively:
1. Insert your own mounting pole (no more than 1 inch outside diameter”) into the sensor.
2. Tighten screws
LTV-R3 Rain Sensor:
Installation:
1. Flip open both locking tabs on your rain sensor and lift off the funnel portion.
2. Pull up on the battery cover and remove.
3. Install 2-AA batteries according to polarity.
4. Reposition the battery cover over the battery compartment, and firmly push down to lock it back into place
5. Remove cardboard and any tape around the rocker before use. These were used to protect the sensor from unwanted movement during shipping.
6. Place the funnel portion back over the sensor and re-secure the locking tabs.
Mounting:
1. Mount in an open area, on a stationary level platform for a more accurate rain count.
Note: Avoid placing the bottom of the rain sensor in a depression that would not allow proper water drainage.
2. Insert the mounting screws through the holes in the bottom of your rain sensor. Do not over tighten.
3. Mount your rain sensor at least 3 feet and optimally 6 feet in the air and in direct line of sight to your station.
4. Your rain sensor should be accessible to allow for periodic cleaning of debris or insects.
5. The maximum wireless transmission range to your station is up to 400 feet (121 meters) in open air, not including walls or floors.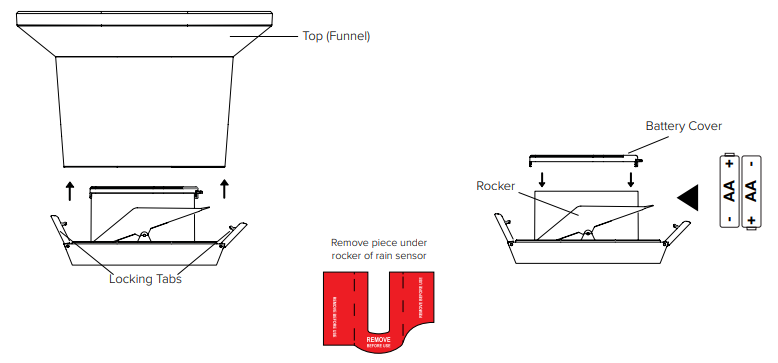
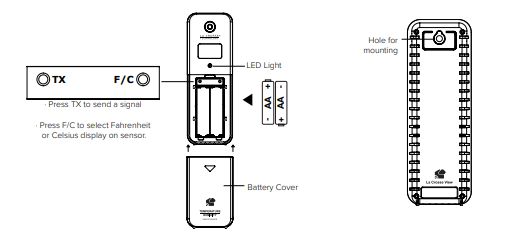
LTV-TH2 Thermo-Hygro Sensor
Installation
1. Install 2-AA batteries according to polarity and replace battery cover.
Mounting:
1. Use the hole at the top to hang your sensor from the back using a nail. Or, insert one mounting screw
through the front of your sensor.
2. Mount your sensor on a north-facing wall or in any shaded area. Under an eave or deck rail is preferred.
3. The maximum wireless transmission range to the weather station is up to 400 feet (121 meters) in open air, not including walls or floors.
4. Be sure your sensor is mounted vertically, to allow moisture to drain out properly.
Note: Watch sensor mounting video: http://bit.ly/TH_SensorMounting
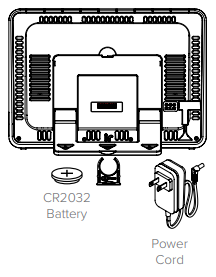
V30v2 (328-10618) Weather Station:
Installation:
1. Insert the power cord into a wall outlet, then into your station.
Remove the red insulation tab from the CR2032 battery installed in the bottom of your weather station to maintain time/date in the event of a power outage.
Mounting:
1. Place your station near an outlet. Power cord is required for operation.
2. Use the mounting holes on the back to place your station on a wall.
3. Use the pull down stand on the back of your station to place on a desk or counter.
4. Your station should remain in good Wi-Fi range of your wireless router to use all the remote monitoring options using the La Crosse View app.